A guide for Product Managers to efficiently manage The Feature Development Lifecycle
Tactics to ship quality features on time


Learn from the mistakes of others. You can’t live long enough to make them all yourself — Eleanor Roosevelt
If I were write on the topic of “making mistakes as a product manager”, I would be able to fill loads and loads of pages with some interesting stories.
Shipping quality features that customers love is a difficult task. There are so many stakeholders involved and so many things to take care of. Despite your best efforts, you often miss out something crucial. These mistakes result in: Delay in shipping, poor customer adoption, revenue loss etc. (Not to mention the damage it does to your reputation)
In my last 3 years as a product manager, I have made a lot of avoidable mistakes while shipping seemingly “simple” features.
With the benefit of hindsight, I now realize that putting proper systems and processes in place can prevent a lot of these mistakes.
In the subsequent paragraphs, I will take you through the different stages of feature development. For each step, I will highlight what happens in that step, what problems might occur and what processes you can set up to avoid making rookie mistakes.
Hopefully, this guide will help you become a more effective and efficient product manager.
Five Steps of Feature Development
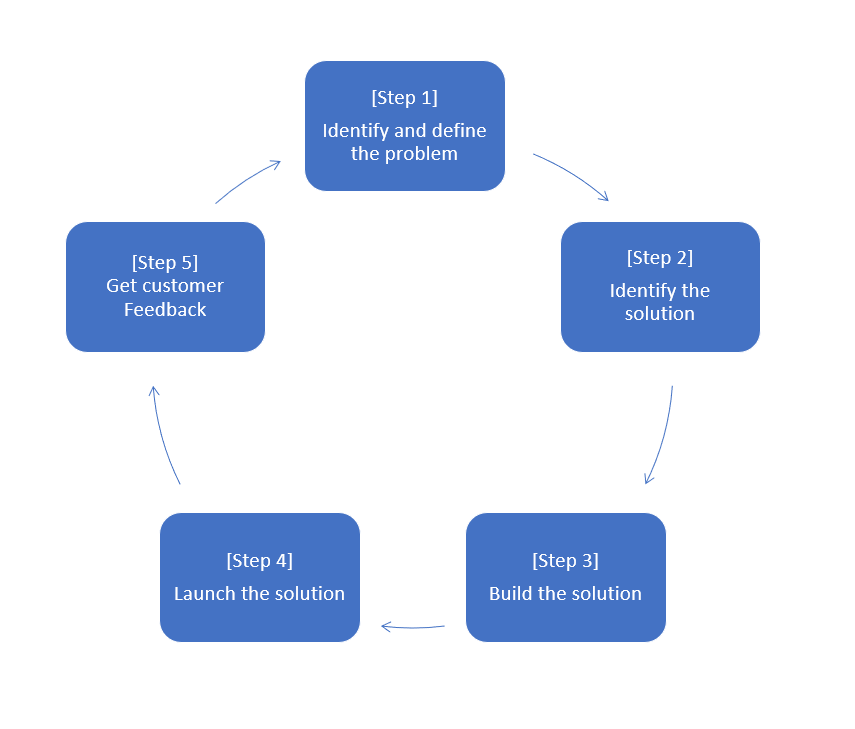
Step 1: Describe the Problem and Scope it
Before you start building the solution, the first step is to understand the exact customer problem you are trying to solve.
As a beginner, you might be tempted to skip this step and jump straight to solutioning. This will lead to the following issues:
Inability to focus on the most important problems faced by customer— Instead, you might end up working on the features which the sales team is making the loudest noise about or the senior management considers top priority.
Lack of clarity on the scope of the solution — You cannot build any feature in its entirety in the first version itself. But unless you scope out the problem correctly, you won’t know which user needs to focus on and which ones to ignore.
Expectation mismatch between different stakeholders — Often, during design reviews I have realized that the designer’s understanding of the problem is very different from my own understanding or my bosses understanding. This happened as we didn’t document the problem properly and agree on the user needs we want to prioritize.
The solution to the above issues is create a product objectives document (POD). A POD is a one page document that specifies the following:
The problem being faced by the user and why is it important to solve it.
The goals — what do we hope to achieve after solving the problem.
Customer quotes — Articulation of the problem in the customer’s words.
User stories— what are the key user needs we will focus on and which ones we’ll ignore.
Once the POD is created, it is circulated among all the stakeholders for review. Getting the POD reviewed helps resolve misunderstandings early on and allows the team to converge on the problem to be solved.
Only after the POD’s approval by all stakeholders should you move to Step 2 — the design phase.
Step 2: Work with Design to Identify the solution to the problem
Once you have clarity on the problem, the next step is to build a solution to the problem.
During the design phase, following are the problems that you may face:
Feature bloat — The team tries to solve multiple user problems at once rather than focusing on the user problem at hand.
Feasibility problems —The solution is technically too complex and cannot be built with the given time and budget constraints.
Usability Issues — The Proposed Solution has a lot of usability issues and the user workflow is not ideal.
While the design team must be given be sufficient room for creative exploration, the importance of focus cannot be overstated.
Having a Product Objectives Document (POD) usually helps prevent problems from arising in the design phase. In addition, I suggest the following:
Use a ‘feature design’ checklist to identify and document all the scenarios for which design states which might be needed. Building them in advance helps avoid back and forth later on.
Review the Work-in-Progress (WIP) wireframes — Rather than reviewing the designs post completion, its better to review initial stage wireframes.
Involve the tech team in the design reviews — The tech team can then call out any technical challenges early on and the designs can be tweaked accordingly.
Seek feedback from the team using clickable prototypes — These clickable prototypes give a realistic understanding of how the solution works. Make sure to get it tested from growth and the support team. Their feedback can help you identify usability issues early on. (If creating clickable prototypes might not be possible, share a walkthrough video with the rest of the team)
Once the designs are frozen, its time to move to Step 3 of feature development — the build phase.
Step 3: Build the solution with Engineering and QA
The build phase is the one where a lot of teams get stuck at. The main problem here is the “delay in timelines”. The initial estimates are often way off from the time when the feature is eventually delivered.
Delays in shipping primarily occur because of the following reasons:
Scope creep — The scope for what was planned continues to increase even after development has started.
Technical limitations/complexities in building — These were not discovered earlier and are create problems later on.
Edge cases discovered midway during the project — This leads to rework at design and engineering’s end, leading to delays. In case of design, there other ongoing projects are also impacted due to the context switching.
In order to avoid the above problems and deliver quality products on time, I would suggest the following:
Scope the project — Rather than delivering everything in one go, split the project into more manageable chunks. Release the chunks as separate versions.
Tech planning before beginning — Make sure that the assigned engineer shares a tech design doc and the development plan before starting to work.
Joint walkthrough to the engineering and QA team — So that edge cases are identified and discussed in advance.
Write Comprehensive PRDs — Make sure to detail out the solution flow and all edge cases to reduce scope for miscommunication. A detailed acceptance criteria also helps the QA team in coming up with better test cases.
Hopefully, these measures will help you keep the delivery delays under manageable control.
You are now ready to embark on the most exciting phase of the Product Manager’s job — the feature launch phase!
Step 4: Its Time to Launch: Working with growth, support and marketing
After weeks of hard work, its finally time to ship the finished feature to the market.
When you launch for the first few times, you would run into problems because of the following assumptions:
Assuming that the other teams (namely growth, support and marketing) know as much about the feature as you do.
Assuming that the customers are as eagerly awaiting the feature launch as you are.
Both these assumptions are rookie mistakes and you should avoid them if you want to see your feature a success.
Here is a checklist of activities that you should do at the time of feature launch:
Give a walkthrough to the other teams explaining the feature’s value proposition, how it works, what is the release plan and what are the limitations.
Create a help article (with the support team’s help) for the more complicated features — This can be used as a ready reference by the internal teams as well as customers.
Decide the kind of marketing you want to do for the feature. For example — do you want to send out a dedicated emailer, do you want to do a separate social media campaign for it etc.
Work on finalizing the marketing communication that would be sent out to customers — As a product manager, you have got the most context on the what & why of the feature. So, make sure that’s captured well by the product marketing team.
All the above points have been written from my experiences of working on a SAAS product. Depending on your use case, you might need to tweak the activities slightly.
Step 5: Close the Loop: Get customer feedback on the shipped feature
Once the feature is shipped, the most important thing is to — NOT FORGET ABOUT IT!
As you move towards building the next set of features, make sure you don’t forget to learn from what you shipped.
Track the Feature Usage — Make sure you track how much is the feature being used. (A rookie mistake to avoid — Forgetting to ship analytics along with the feature)
Seek Customer Feedback — Reach out to customers who used the feature. Your goal should be to understand — what was their motivation for using the feature, how was their experience and what could have been done better.
Schedule a retrospective with the engineering and QA team to understand — what went well and what could have been done better.
The goal of the above two activities is two-fold:
Identify process improvements that you want to incorporate while working on other features.
Identify the key user needs for version 2 of the feature — As and when you come back to enhancing the feature, you should be aware of the functionalities that should be prioritized.
Conclusion
As a Product Manager, you will read a lot of theory on product management. However, theories and frameworks are often far removed from practice.
In my experience, the fastest and the surest way to grow as a product manager is by shipping features. That’s how you will learn to do stakeholder management, take quick decisions, manage timelines and understand customer needs and wants.
So, Keep shipping! Keep iterating! And Keep learning!